Business plan vs. business roadmap

Icons, billeder brugt til illustration.

DIV/Opsætninger

Sikkerhed for os og vor kunder.

...
Dette Site må ikke vises til nogen!!!!!!.

Generer adgangskode.

Degenerer adgangskode.

...
Formulér og test hypoteser om kode som forretningsmodellen

Foreløbig laves en dørstation til Videx. Og denne model af en website er et mix af kode samt anvendeligheden af de enkelte komponenter. Jeg tror at hvis kode, forretnings model samt tydelig forklaring for at producere et produkt er en rød tråd gennem dette website. Kan der laves en skabelon der får produkter hurtigt gennem udvikling. Med andre ord skal enhver kunne producere ud fra dette websites opskrifter.

  1. Værditilbud
    Værditilbuddet er en enkel form for beskrivelse af produktidé i forhold til kommende kunder.
    14
  2. Segmenter
    Hvem sælger vi til?
    14
  3. Salgskanaler
    Hvordan når vi ud til vores segmenter?
    14
  4. Arbejdsfordeling
    Hvem laver hvad?
    14
  5. Produktion
    Hvem skal producere varen, og til hvilken pris kan de gøre det?
    14
  6. Forventede udgifter og indtægter
    Likviditetsbudgettering.
    14
...
Idé og kodesikkerhed.

I sidste ende er en kode idé ikke meget værd, hvis ikke den kan gøres til en forretning, som vi tjener penge på. Men vigtigst er at idé som kode beskyttes. Arbejder på det.

DNS Server.

...
Hvad gør en DNS Server?

En DNS Server som FreeDNS, gør at man kan bruge navne som vist på billedet. Og ud fra et Domain som man ejer, kan skabe lige så mange navne man vil, ud fra sit Domain navn. Dette er en gratis løsning for at give vor kunder, eller enheder, som kameraer et web navn f.eks. kamera99.doordk.com eller hansi.doordk.com.

adresse1.doordk.com

adresse2.doordk.com

adresse3.doordk.com

adresse4.doordk.com

adresse5.doordk.com

osv.doordk.com


Under menu'en DNS ACME, ses hvordan man laver en secure HTTPS:// adresse med FreeDNS.

Link. FreeDNS https://freedns.afraid.org/

På den lange bane, må vi selv have(lave) en DNS server. Og ikke være afhængig af FreeDNS.

collapseBuiness_3

collapseBuiness_4

Rock SE Server Configuration
Get started
Download balenaetcher, and install.
Download putty, and install.
Download winscp, and install.
Ubuntu server, use this version Ubuntu 20 Server(Linux 4.4). file rockpi-4b-ubuntu-focal-server-arm64-20221109-1331-gpt.img.xz
Windows. I "Find" eller "Search" skriv:
cmd
# herefter.
ping rockpi-4b
Hvis rocken bliver fundet. Kommer der et svar som:
Pinging rockpi-4b.local [2a02:aa7:4042:3549:1cc9:891c:d03a:8c06] with 32 bytes of data:
Reply from 2a02:aa7:4042:3549:1cc9:891c:d03a:8c06: time<1ms
Hvis der kommer svar er der klar til at connecte med Putty. Start putty og..

Connect til rockpi-4b med Putty.
...
Host Name:rockpi-4b
Port:22
Connection type:SSH/telnet
Ved at vælge save, kan man gemme denne session.
login as: rock
rock@rockpi-4b's password: rock

Sound config, expand filesystem, timezone e.t.c.

Find default speaker output.
aplay --list-devices
Find Device [USB PnP Sound Device], da vil vil sætte Rocken til at bruge dette til afspiller når den starter op.:
card 2: Device [USB PnP Sound Device], device 0: USB Audio [USB Audio]

Here finding the soundcard it is called card 2. It´s the "2" there is importent and device 0. Used to set the default output(speaker) soundcard.
pcm "hw:2,0"

Find default microphone input.
arecord --list-devices
Find Device [USB PnP Sound Device:
card 2: Device [USB PnP Sound Device], device 0: USB Audio [USB Audio]

Here finding the soundcard it is called card 2. It´s the "2" there is importent and device 0. Used to set the default input(microphone) soundcard.
pcm "hw:2,0"

The USB sound device can be made the default audio device by make a file named ".asoundrc" in /home/rock :
and in /etc/asound.conf
sudo nano ~/.asoundrc
sudo nano /etc/asound.conf

pcm.!default {
	type asym
	capture.pcm "mic"
	playback.pcm "speaker"
}
pcm.mic {
	type plug
	slave {
		pcm "hw:2,0"
	}
}
pcm.speaker {
	type plug
	slave {
		pcm "hw:2,0"
	}
}
Update Firmware.
Når man forsøger at update Rocken. Går den i ged??.
Løsningen er at update key filen.
Update key.
sudo apt-key adv --keyserver hkp://keyserver.ubuntu.com:80 --recv-keys 9B98116C9AA302C7
Meddeles tilbage der mangler keys, skift 9B98116C9AA302C7 ud med dem der mangler.

Der kan nu updates.
sudo apt update && sudo apt upgrade -y && sudo apt autoremove && sudo apt autoclean

Change password.
echo "rock:spacewalk" | sudo chpasswd

Set tim zone.
sudo timedatectl set-timezone Europe/Copenhagen

Set host name.
sudo nano /etc/hosts
Change rockpi-4b, to.
rockpi4b

Give Rock permission to /home/rock or ~/.
sudo hostnamectl --static set-hostname rockpi4b
sudo chown -R rock:rock /home/rock

Alsamixer.
Type "Alsamixer", select soundcard. Then adjust the mic & volume and exit.
sudo alsactl store

Reboot.
sudo reboot

Update CMake

SimpleBLE relies heavily on plenty of CMake functionality. So we have to update CMake to lastest version.
Check your version.
cmake --version
# check latest release version. At this time this is 3.29.0
If yours to old?. First remove the old version.
cd ~
sudo apt purge --autoremove -y cmake

Update system, Compile and install the new version.
Or install from pre compiled version?.
sudo apt update
sudo apt install -y build-essential libpython3-dev libusb-dev libdbus-1-dev libglib2.0-dev libudev-dev libical-dev libreadline-dev && \
sudo apt install -y libssl-dev python-dev libxml2-dev libxslt-dev build-essential nlohmann-json3-dev
wget https://cmake.org/files/v3.29/cmake-3.29.0.tar.gz
tar -xzvf cmake-3.29.0.tar.gz
cd cmake-3.29.0
./bootstrap
make -j$(nproc)
sudo make install

After backup. Clean Up.
cd ~
rm cmake-3.29.0.tar.gz && sudo rm -R cmake-3.29.0

After that, check version.
cmake --version

Backup newly Compiled Cmake vesion.
cd ~
tar -czf cmake_bac_3.29.0.tar.gz cmake-3.29.0

Extract CMake pre compiled version. And install from this. Time saver.
tar xfz cmake_bac_3.29.0.tar.gz
cd cmake-3.29.0
sudo make install
cd ~
rm cmake_bac_3.29.0.tar.gz && sudo rm -R cmake-3.29.0

Check if soundcard settings works?.
aplay /usr/share/sounds/alsa/Front_Center.wav
arecord -D plughw:2,0 --duration=3 test.wav && aplay test.wav

############### Login to FreeDNS, set up subdomain(A Record), and IP address. ################
############### Install required certbot package and tools for DNS ################
sudo apt install -y libc++-dev git socat certbot dnsutils zip unzip cron locales

############## Now create a file wwan0_sim7600.sh, contain bash script from file. ################
Change this line(6) to reflect the static IP to use. static_address="80.91.3.214"
cd ~
nano wwan0_sim7600.sh
Make it exe ready, and run it.
chmod u+x wwan0_sim7600.sh
./wwan0_sim7600.sh
If no output after run. Alles OK.

Create a cron job that run every minute. To check if IP addresse has changed?.
sudo crontab -e
Write this at the bottom of the file.
* * * * * /home/rock/wwan0_sim7600.sh >> /home/rock/wwan0_sim7600.log 2>&1 &

Check status of cron service.
sudo systemctl status cron

############## Use dig command to check the DNS record ################
dig +short -t a doordk.com
dig +short -t a doorbell.doordk.com
dig +short -t a aldersrogade.doordk.com
# It should return the (public) IP address of your server. If not fix it.

############## Install acme.sh ################
sudo -i
git clone https://github.com/Neilpang/acme.sh.git
cd acme.sh
./acme.sh --install --accountemail "users FreeDns email"

# After the installation, you can use sudo source .bashrc or just close/open your session to enable acme.sh bash completion.
source ~/.bashrc

# Or..Close current terminal and reopen again to make the alias take effect
exit
exit

# Login and generate for FREEDNS account
# Export FreeDNS userid and password in following variables...
# FREEDNS_User=user FreeDns email
# FREEDNS_Password=password
# login cookie is saved in acme account config file so userid / pw
# need to be set only when changed.
sudo -i
cd ./acme.sh
export FREEDNS_User="users FreeDns email"
export FREEDNS_Password="password"
./acme.sh --issue --dns dns_freedns -d doorbell.doordk.com --keylength 4096 --force
# The default location for acme.sh to store certs is:
# /root/.acme.sh/doorbell.doordk.com/

############## Backup ################
# Backup acme.sh
sudo zip -r ~/acme_doorbell_doordk_com_bak.zip /root/.acme.sh

############## Restore ################
# Restore as user rock
sudo unzip ~/acme_doorbell_doordk_com_bak.zip -d /
sudo -i
cd .acme.sh

############### Upgarde and enable auto upgrade: ################
./acme.sh --upgrade --auto-upgrade

############## Update Certs ################
# All
./acme.sh --renew-all --force

# Single
./acme.sh --renew -d doorbell.doordk.com --force

############## Shows the subject and domain names in the csr. ################
./acme.sh --showcsr --csr /root/.acme.sh/doorbell.doordk.com/doorbell.doordk.com.csr

############### Copy the relevant certificates to a location of your choice ################
# Make dir for certs
mkdir -p /home/rock/certs/doorbell.doordk.com

# Install to location
./acme.sh --install-cert -d doorbell.doordk.com \
--cert-file /home/rock/certs/doorbell.doordk.com/cert.pem \
--key-file /home/rock/certs/doorbell.doordk.com/key.pem \
--fullchain-file /home/rock/certs/doorbell.doordk.com/fullchain.pem \
--ca-file /home/rock/certs/doorbell.doordk.com/ca.pem

Back as user rock.
exit

# Set group
sudo chown -R -v www-data:www-data /home/rock/certs

# Set owner
sudo chown -R -v www-data /home/rock/certs

# followed by
sudo chmod -R 775 ~/certs

# Add our user to www-data group.
sudo usermod -a -G www-data rock

# Generate DH param
cd /home/rock/certs/doorbell.doordk.com
openssl dhparam -out dh.pem 4096
Or copy an old one.
sudo cp dh.pem /home/rock/certs/doorbell.doordk.com

############## Edit account.conf ################
sudo nano /root/.acme.sh/account.conf
# You can get the dns_cookie by analyzing the saved cookie in your browser while logged in.
# Firefox: Webudvikler->Webconsole->Lagerplads->dns_cookie

Compile install libserialport

libserialport: cross-platform library for accessing serial ports.
sudo apt install -y git autoconf libtool
git clone https://github.com/sigrokproject/libserialport.git
cd libserialport
./autogen.sh
./configure
make -j$(nproc)
sudo make install

backup compiled libserialport.
tar -czf libserialport_bac.tar.gz libserialport

extract compiled libserialport.
tar xfz libserialport_bac.tar.gz
cd libserialport/
sudo make install
cd ~
rm libserialport_bac.tar.gz && sudo rm -R libserialport_bac

Her er et modem test program Send "AT", recive "OK" i c++.
Example AT Modem Libserialport.

/dev/ttyUSB2 er et modems AT port.
					  
SerialClass *serial=NULL;	
serial=new SerialClass();
serial->set_port("/dev/ttyUSB2");
if( !serial->Start() ){
	std::cout << "error findig port? " << std::endl;
	letter = 'x';
}
					  
					
Når programmet kører tast "a" og Enter for test.
Sender "AT\r" til modemet, og forventer at få svaret "OK".
time_out=3; Giver modemet 3seconds max, Har modemet ikke svaret inden kommer en fejl meddelse "Time OUT????".
ellers "Hurray: expected: OK"
std::string send_val="AT\r";
std::string expected="OK";
serial->write(send_val,expected);

Her er header cpu.h PDU filen c++.
PDU header .h file.

Her er pdu.cpp PDU filen c++.
PDU .cpp file.

Her er et modem test program som sender en SMS i PDU format, i c++.
Når programmet kører tast "b" og Enter for test.
Example AT Modem Libserialport.

Når man sætter et USB device ind, får det en, som ovenfor "/dev/ttyUSB2".
Men det kan ske at den har fået denne adresse tilfældige adresse "/dev/ttyUSB4".
Og så virker programmet ikke mere. Men der en løsning "symlink".
Ved symlink forbinder man hardware id'et med et navn.
Som vist under menu'en SIM7600
Man bruger således simlink navnet til at finde adressen.
Som det ses er der givet symlink adressen "/dev/ttySIM02" til "AT" porten på modemet.
Koden her viser, hvordan man finder den rigtige adresse "/dev/ttyUSBX".
	
std::string ttyUSB_port="";					  
std::string ttySIM_port="/dev/ttySIM02";
std::string ret=ExecCmd("ls -l /dev/ttySIM0*");
int pos = ret.find(ttySIM_port);
if( pos > 0 ){
	// Copy substring after pos 
	std::string str = ret.substr(pos + 1);
	boost::algorithm::trim(str);

	std::vector strs;				
	boost::split(strs, str , boost::is_any_of("\n"));
	if( strs.size() > 0 ){
		//std::cout  << strs.size() << " str: " << strs[0] << std::endl;
		std::vector strs_1;				
		boost::split(strs_1, strs[0] , boost::is_any_of(" "));
		if( strs_1.size() > 0 ){
			ttyUSB_port=strs_1[strs_1.size()-1];
			boost::algorithm::trim(ttyUSB_port);
			ttyUSB_port="/dev/"+ttyUSB_port;
			//std::cout << " ttyUSB_port: " << ttyUSB_port << std::endl;
		}else{
			std::cout << "No serial PORT found" << std::endl;
			return 1;
		}
	}else{
		std::cout << "No serial PORT found" << std::endl;
		return 1;
	}
}else{
	std::cout << "No serial PORT found" << std::endl;
	return 1;
}

Boost Beast & minIni
Boost asio beast compile install.
Vær opmærksom på at rocken går helt dø ved udpakning af boost_1_84_0.tar.gz, op til flere minutter.
cd ~
sudo apt install -y libssl-dev python-dev libxml2-dev libxslt-dev build-essential nlohmann-json3-dev
wget https://boostorg.jfrog.io/artifactory/main/release/1.84.0/source/boost_1_84_0.tar.gz
tar xfz boost_1_84_0.tar.gz
cd boost_1_84_0/
./bootstrap.sh --prefix=/usr
./b2 stage -j$(nproc) threading=multi link=shared
sudo ./b2 install threading=multi link=shared
cd ~
rm boost_1_84_0.tar.gz

#backup boost
tar -czf boost_1_84_0_bac.tar.gz boost_1_84_0

#extract boost
tar xfz boost_1_84_0_bac.tar.gz
sudo apt install -y libssl-dev python-dev libxml2-dev libxslt-dev build-essential nlohmann-json3-dev
cd boost_1_84_0/
sudo ./b2 install threading=multi link=shared
cd ~
rm boost_1_84_0_bac.tar.gz && sudo rm -R boost_1_84_0

Advanced_server_flex Test.
cd ~
mkdir -p ~/code/advanced/server-flex/build
cp ~/boost_1_84_0/libs/beast/example/advanced/server-flex/advanced_server_flex.cpp ~/code/advanced/server-flex
cd ~/code/advanced/server-flex
nano advanced_server_flex.cpp
Now change the line #include "example/common/server_certificate.hpp" to---
#include "server_certificate.hpp"

Before we start testing Boost beast, we want to make the support for ini files.
minIni
minIni is a portable and configurable library for reading and writing ".INI" files.
Read the dokumentation at this site. To have the support for ini files, get the files for it.
cd ~/code/advanced/server-flex
git clone https://github.com/compuphase/minIni.git
cp ./minIni/dev/minGlue.h ./minIni/minGlue.h
cp ./minIni/dev/minIni.c ./minIni/minIni.c
cp ./minIni/dev/minIni.h ./minIni/minIni.h

Now make file door_server.ini, to store settings.
mkdir -p ~/code/advanced/server-flex/build/assets
nano ~/code/advanced/server-flex/build/assets/door_server.ini
[door_server]
port=6002
threads=1
doc_root=/home/rock/code/advanced/server-flex/build
certs_path=/home/rock/certs
domain=doorbell.doordk.com
ESSID=rockpi
wifi_password=spacewalk
Auto_connect_wifi=1
Phone_Device=/dev/ttyUSB3
Phone_Baudrate=115200

# Add load certificate from files:
nano server_certificate.hpp
Now change all of server_certificate.hpp to reflect this file.
Example server_certificate.html.

nano CMakeLists.txt
Now change all of CMakeLists.txt to reflect this file.
Example CMakeLists.txt.

cd build
cmake ..
make

To clean project you can simply recursively delete all files/directories within the build directory, for example:
rm -r *

But this clean everything, this is not always what we want?.
More work, but now we are in control?. Make a clean up file in the build directory.
nano clean.sh
#!/bin/bash
if [ -f cmake_install.cmake ]; then
rm cmake_install.cmake
fi
if [ -f CMakeCache.txt ]; then
rm CMakeCache.txt
fi
if [ -f server_flex ]; then
rm server_flex
fi
if [ -d CMakeFiles ]; then
rm -R CMakeFiles
fi
find . -type f ! -name "*.*" -delete
Now make it exe ready.
chmod u+x clean.sh
You can now run.
./clean.sh
Make index.html
nano index.html
Here is a copy of index.html.

Run server_flex 0.0.0.0(root ip) 8080(Port) .(this directory) 1(how many threads)
sudo ./server_flex 0.0.0.0 8080 . 1

Find servers ip adresse.
ip addr show eth0 | grep "inet\b" | awk '{print $2}' | cut -d/ -f1
Test. Go to your browser.
192.168.1.150:8080

Install FFMPEG

Download the latest git build.
wget https://johnvansickle.com/ffmpeg/builds/ffmpeg-git-arm64-static.tar.xz
tar xvf ffmpeg-git-arm64-static.tar.xz

Find ffmpeg version folder
ls
At this time it is:
ffmpeg-git-20240301-arm64-static

Check if all is there.
ls ffmpeg-git-20240301-arm64-static

Start using ffmpeg with the relative path to the binary.
./ffmpeg-git-20240301-arm64-static/ffmpeg

Check for old version.
whereis ffmpeg
If its show "ffmpeg:" there is not any ffmpeg at the system. We are all set.
If its show "ffmpeg: /usr/bin/ffmpeg". Then.
sudo rm /usr/bin/ffmpeg

Do the same for ffprobe
whereis ffprobe

Show the exe path for the system.
echo $PATH

According to my shell's path I have exe files in /usr/local/bin.
Move the static binaries ffmpeg and ffprobe into the shell's path.
sudo mv ffmpeg-git-20240301-arm64-static/ffmpeg ffmpeg-git-20240301-arm64-static/ffprobe /usr/local/bin/

Check if its working?.
whereis ffmpeg
whereis ffprobe

Make install Openh264
Install tools.
sudo apt install -y libssl-dev python-dev libxml2-dev libxslt-dev build-essential nlohmann-json3-dev

cd ~
git clone https://github.com/cisco/openh264.git
cd openh264
make -j$(nproc)
sudo make install
cd ~

Compile Install Asterisk


Install dependencies
sudo apt update && sudo apt dist-upgrade

sudo apt install -y autoconf binutils-dev build-essential ca-certificates curl file \
libcurl4-openssl-dev libedit-dev libgsm1-dev libogg-dev libpopt-dev libresample1-dev \
libspandsp-dev libspeex-dev libspeexdsp-dev libsqlite3-dev libsrtp2-dev libssl-dev \
libvorbis-dev libxml2-dev libxslt1-dev odbcinst portaudio19-dev procps unixodbc \
unixodbc-dev uuid uuid-dev xmlstarlet libnewt-dev libncurses5-dev libjansson-dev \
subversion pkg-config libtool libopus-dev libopusfile-dev

Download and compile, install.
cd ~
wget https://downloads.asterisk.org/pub/telephony/asterisk/releases/asterisk-20.2.1.tar.gz
tar xf asterisk-20.2.1.tar.gz
cd asterisk-20.2.1
nano third-party/pjproject/patches/config_site.h

**********************************************
#define PJMEDIA_MAX_SDP_MEDIA 99 #81
**********************************************

sudo contrib/scripts/install_prereq install
sudo contrib/scripts/get_mp3_source.sh
sudo ./configure
sudo make menuselect

~
"Add on" format_mp3
"Core Sound Packages" CORE-SOUNDS-EN-WAV,CORE-SOUNDS-EN-GSM
"Extras Sound Packages" EXTRA-SOUNDS-EN-WAV
"Codec Translators" codec_opus codec_silk
~

sudo make -j$(nproc)
sudo make install
sudo make samples
sudo make config
sudo make install-logrotate
sudo ldconfig

sudo truncate -s 0 /etc/logrotate.d/asterisk
sudo nano /etc/logrotate.d/asterisk
**********************************************

/var/log/asterisk/debug /var/log/asterisk/console /var/log/asterisk/full /var/log/asterisk/messages /var/log/asterisk/*log {
        missingok
        rotate 15
        compress
        delaycompress
        notifempty
        size 2M
        create 640 asterisk asterisk
        sharedscripts
        postrotate
              /usr/sbin/asterisk -rx 'logger reload' > /dev/null 2> /dev/null
        endscript
}
**********************************************

# Install opus, for some reason menuselect option above does not working
wget http://downloads.digium.com/pub/telephony/codec_opus/asterisk-20.0/x86-64/codec_opus-20.0_1.3.0-x86_64.tar.gz
tar -xzf codec_opus-20.0_1.3.0-x86_64.tar.gz
cd codec_opus-20.0_1.3.0-x86_64
sudo cp codec_opus.so /usr/lib64/asterisk/modules/
sudo cp format_ogg_opus.so /usr/lib64/asterisk/modules/
sudo cp codec_opus_config-en_US.xml /var/lib/asterisk/documentation/

# Set permisson and copy certificates for asterisk
sudo addgroup asterisk
sudo adduser --system --home /var/lib/asterisk --no-create-home --ingroup asterisk --shell /bin/false asterisk

sudo adduser asterisk dialout && sudo adduser asterisk audio
sudo chown -R asterisk:asterisk /var/{lib,log,run,spool}/asterisk /usr/lib/asterisk /etc/asterisk

sudo mkdir /etc/asterisk/keys
sudo chown asterisk:asterisk /etc/asterisk/keys

sudo cp /home/rock/certs/doorbell.doordk.com/fullchain.pem /etc/asterisk/keys
sudo cp /home/rock/certs/doorbell.doordk.com/key.pem /etc/asterisk/keys

sudo chown asterisk:asterisk /etc/asterisk/keys/fullchain.pem /etc/asterisk/keys/key.pem
sudo chmod 600 /etc/asterisk/keys/fullchain.pem /etc/asterisk/keys/key.pem

sudo nano /etc/default/asterisk
uncomment the following two lines:
************************************

AST_USER="asterisk"
AST_GROUP="asterisk"
************************************

# Backup http.conf
sudo cp /etc/asterisk/http.conf /etc/asterisk/http.conf.bak

Paste at the end of file
sudo nano /etc/asterisk/http.conf
************************************

enabled=yes
bindport=8088

;; tls certificados
tlsenable=yes
tlsbindaddr=0.0.0.0:8089
tlscertfile=/etc/asterisk/keys/fullchain.pem
tlsprivatekey=/etc/asterisk/keys/key.pem
************************************

# Backup pjsip.conf
sudo cp /etc/asterisk/pjsip.conf /etc/asterisk/pjsip.conf.bak

Paste at the end of file
sudo nano /etc/asterisk/pjsip.conf
************************************

[general]
allowguest = no

[transport-udp]
type = transport
protocol = udp
bind = 0.0.0.0:5060
external_media_address = 80.91.3.214         ;; Public IP
external_signaling_address = 80.91.3.214     ;; Public IP
;local_net = 172.50.50.90/255.255.255.0          ;; Docker IP

[transport-wss]
type=transport
protocol=wss
bind=0.0.0.0
external_media_address = 80.91.3.214         ;; Public Ip
external_signaling_address = 80.91.3.214     ;; Public Ip
;local_net = 172.50.50.90/255.255.255.0          ;; Docker Ip

;;
;; 6000 UDP
;;

[6000]
type = aor
max_contacts = 1
remove_existing=yes

[6000]
type=auth
auth_type=userpass
password=1234
username=6000

[6000]
type = endpoint
transport = transport-udp
context = office-phones
disallow = all
;allow = !all,opus,ulaw,alaw,vp8,vp9
allow = !all,ulaw,alaw,h264,vp8
aors = 6000
auth = 6000
webrtc=no

;;
;; 7000 UDP
;;
[7000]
type = aor
max_contacts = 1
remove_existing=yes

[7000]
type=auth
auth_type=userpass
password=1234
username=7000

[7000]
type = endpoint
transport = transport-udp
context = office-phones
disallow = all
;allow = !all,opus,ulaw,alaw,vp8,vp9
allow = !all,ulaw,alaw,h264,vp8
aors = 7000
auth = 7000
webrtc=no

;;
;; 7001 Webrtc
;;
[7001]
type = aor
max_contacts = 1
remove_existing=yes

[7001]
type=auth
auth_type=userpass
password=1234
username=7001

[7001]
type = endpoint
transport = transport-wss   ;; important
context = office-phones
disallow = all
;allow = !all,opus,ulaw,alaw,vp8,vp9
allow = !all,ulaw,alaw,h264,vp8
aors = 7001
auth = 7001
dtls_auto_generate_cert=no  ;; important
webrtc=yes	            ;; important
force_rport=yes             ;; important 
direct_media=yes            ;; important

;;
;; 7002 Webrtc
;;
[7002]
type = aor
max_contacts = 1
remove_existing=yes

[7002]
type=auth
auth_type=userpass
password=1234
username=7002

[7002]
type = endpoint
transport = transport-wss   ;; important
context = office-phones
disallow = all
;allow = !all,opus,ulaw,alaw,vp8,vp9
allow = !all,ulaw,alaw,h264,vp8
aors = 7002
auth = 7002
dtls_auto_generate_cert=no  ;; important
webrtc=yes	            ;; important
force_rport=yes             ;; important 
direct_media=yes            ;; important

[webrtc-phones](!)
context=office-phones
transport=transport-wss
;allow=!all,opus,ulaw,alaw,vp8,vp9
allow = !all,ulaw,alaw,h264,vp8
webrtc=yes
************************************

# Backup extensions.conf
sudo cp /etc/asterisk/extensions.conf /etc/asterisk/extensions.conf.bak
Paste after [general]
sudo nano /etc/asterisk/extensions.conf
************************************

[office-phones]
exten => 6000,1,Dial(PJSIP/6000)
exten => 7000,1,Dial(PJSIP/7000)
exten => 7001,1,Dial(PJSIP/7001)
exten => 7002,1,Dial(PJSIP/7002)
same => n,Playback(hello-world)
same => n,Hangup()
************************************

# Backup modules.conf
sudo cp /etc/asterisk/modules.conf /etc/asterisk/modules.conf.bak
Paste at the end of file
sudo nano /etc/asterisk/modules.conf
************************************

noload = app_voicemail_imap.so
noload = app_voicemail_odbc.so
noload => res_config_ldap.so
load = res_crypto
load = res_http_websocket
load = res_pjsip_transport_websocket
load = codec_opus
load = res_srtp
************************************

# Backup rtp.conf
sudo cp /etc/asterisk/rtp.conf /etc/asterisk/rtp.conf.bak
Change and paste after [general]
sudo nano /etc/asterisk/rtp.conf
************************************

[general]
rtpstart=10000
rtpend=10099
icesupport=yes                      ;; important
strictrtp=no                        ;; important
stunaddr=stun.l.google.com:19302    ;; important
************************************

# Backup cel.conf
sudo cp /etc/asterisk/cel.conf /etc/asterisk/cel.conf.bak
Paste at the end of file
sudo nano /etc/asterisk/cel.conf
************************************

radiuscfg => /etc/radcli/radiusclient.conf
************************************

# Backup cdr.conf
sudo cp /etc/asterisk/cdr.conf /etc/asterisk/cdr.conf.bak
Paste at the end of file
sudo nano /etc/asterisk/cdr.conf
************************************

[radius]
radiuscfg => /etc/radcli/radiusclient.conf
************************************

sudo systemctl restart asterisk
sudo systemctl status asterisk
sudo asterisk -rvvvvvvvvvvvvvvvvvv

If this error: Unable to connect to remote asterisk (does /var/run/asterisk/asterisk.ctl exist?). Run.
sudo systemctl restart asterisk
And try again.

localhost*CLI>http show status
localhost*CLI>pjsip show endpoints
localhost*CLI>pjsip show registrations
localhost*CLI>reload

Activate fail2ban asterisk
This does a 18-days ban on the IP that performed the attack.
sudo nano /etc/fail2ban/jail.local
************************************

enabled = true
port     = 5060,5061
filter = asterisk
#action_  = %(default/action_)s[name=%(__name__)s-tcp, protocol="tcp"]
#%(default/action_)s[name=%(__name__)s-udp, protocol="udp"]
action = %(action_)s
logpath  = /var/log/asterisk/messages
findtime = 10800
maxretry = 3
bantime = 604800
************************************

Restart fail2ban/status.
sudo systemctl restart fail2ban
sudo systemctl status fail2ban
sudo fail2ban-client status asterisk

# Configuring Firewall
sudo ufw allow 5060/udp
sudo ufw allow 10000:20000/udp


# Starting Asterisk
sudo systemctl enable asterisk
sudo systemctl start asterisk
asterisk -V
sudo asterisk -rvvvvv
Use quit or exit to get out.

Check status.
sudo systemctl status asterisk

#If On error,look in system filen.
sudo journalctl -u asterisk.service --since today

#Backup in asterisk .conf files.
					
sudo cp /etc/asterisk/asterisk.conf /etc/asterisk/asterisk.bak && \
sudo cp /etc/asterisk/cdr.conf /etc/asterisk/cdr.bak && \
sudo cp /etc/asterisk/cel.conf /etc/asterisk/cel.bak && \
sudo cp /etc/asterisk/extensions.conf /etc/asterisk/extensions.bak && \
sudo cp /etc/asterisk/http.conf /etc/asterisk/http.bak && \
sudo cp /etc/asterisk/logger.conf /etc/asterisk/logger.bak && \
sudo cp /etc/asterisk/modules.conf /etc/asterisk/modules.bak && \
sudo cp /etc/asterisk/pjsip.conf /etc/asterisk/pjsip.bak && \
sudo cp /etc/asterisk/rtp.conf /etc/asterisk/rtp.bak
#Deploy asterisk .conf files.
					
sudo cp /home/rock/asterisk_conf/asterisk.conf /etc/asterisk/asterisk.conf && \
sudo cp /home/rock/asterisk_conf/cdr.conf /etc/asterisk/cdr.conf && \
sudo cp /home/rock/asterisk_conf/cel.conf /etc/asterisk/cel.conf && \
sudo cp /home/rock/asterisk_conf/extensions.conf /etc/asterisk/extensions.conf && \
sudo cp /home/rock/asterisk_conf/http.conf /etc/asterisk/http.conf && \
sudo cp /home/rock/asterisk_conf/logger.conf /etc/asterisk/logger.conf && \
sudo cp /home/rock/asterisk_conf/modules.conf /etc/asterisk/modules.conf && \
sudo cp /home/rock/asterisk_conf/pjsip.conf /etc/asterisk/pjsip.conf && \
sudo cp /home/rock/asterisk_conf/rtp.conf /etc/asterisk/rtp.conf
#Save asterisk .conf files for later use.
					
sudo cp /etc/asterisk/asterisk.conf /home/rock/asterisk_conf/asterisk.conf && \
sudo cp /etc/asterisk/cdr.conf /home/rock/asterisk_conf/cdr.conf && \
sudo cp /etc/asterisk/cel.conf /home/rock/asterisk_conf/cel.conf && \
sudo cp /etc/asterisk/extensions.conf /home/rock/asterisk_conf/extensions.conf && \
sudo cp /etc/asterisk/http.conf /home/rock/asterisk_conf/http.conf && \
sudo cp /etc/asterisk/logger.conf /home/rock/asterisk_conf/logger.conf && \
sudo cp /etc/asterisk/modules.conf /home/rock/asterisk_conf/modules.conf && \
sudo cp /etc/asterisk/pjsip.conf /home/rock/asterisk_conf/pjsip.conf && \
sudo cp /etc/asterisk/rtp.conf /home/rock/asterisk_conf/rtp.conf					

Backup asterisk .conf files for later use.
cd ~
tar -czf asterisk_conf_bak.tar.gz asterisk_conf

Download asterisk_conf_bak.tar.gz

Extract asterisk_conf_bak.
cd ~
wget https://blohm.com/wp-content/themes/blohm-child/page-templates/rock/asterisk/files/asterisk_conf_bak.tar.gz
tar xfz asterisk_conf_bak.tar.gz

#remove
sudo make uninstall-all
sudo killall -9 safe_asterisk
sudo killall -9 asterisk
sudo systemctl disable asterisk

cd /usr/src/
sudo rm -rf /etc/asterisk && \
sudo rm -rf /var/log/asterisk && \
sudo rm -rf /var/lib/asterisk && \
sudo rm -rf /var/lib64/asterisk && \
sudo rm -rf /var/spool/asterisk && \
sudo rm -rf /usr/lib/asterisk && \
sudo rm -rf /usr/lib64/asterisk
sudo reboot

Check if modem sim7600G is present:
lsusb
If Showning:
*****************************************
Bus 007 Device 004: ID 1e0e:9001 Qualcomm / Option
*****************************************
Then QMI/RMNET network interface is enabled, default for sim7600.

Check for port assignment
ls -l /dev/ttyUSB*
Shut show:
crw-rw---- 1 root dialout 188, 0 Apr 10 17:53 /dev/ttyUSB0
crw-rw---- 1 root dialout 188, 1 Apr 10 17:53 /dev/ttyUSB1
crw-rw---- 1 root dialout 188, 2 Apr 10 17:53 /dev/ttyUSB2
crw-rw---- 1 root dialout 188, 3 Apr 10 17:53 /dev/ttyUSB3
crw-rw---- 1 root dialout 188, 4 Apr 10 17:53 /dev/ttyUSB4
Interface number
0 USB serial Diagnostic Interface
1 USB serial GPS NMEA Interface
2 USB serial AT port Interface
3 USB serial Modem port Interface
4 USB serial USB Audio Interface
Have a ethernet interface. Not USB
5 Net wwan interface

Thise ports can change name, after reboot etc.
Make:
/dev/ttySIM00 point_to -> ttyUSB0
/dev/ttySIM01 point_to -> ttyUSB1
/dev/ttySIM02 point_to -> ttyUSB2
/dev/ttySIM03 point_to -> ttyUSB3
/dev/ttySIM04 point_to -> ttyUSB4
Assign fixed device name to USB port.
sudo lsusb -v | grep 'idVendor\|idProduct\|iProduct\|iSerial'
Output:
idVendor 0x1e0e Qualcomm / Option
idProduct 0x9001
iProduct 2 SimTech, Incorporated
iSerial 3 0123456789ABCDEF

Create Symlink:
sudo nano /etc/udev/rules.d/99-usb-serial.rules
If iSerial is 0, omit it.
SUBSYSTEM=="tty", ATTRS{idVendor}=="1e0e", ATTRS{idProduct}=="9001", SYMLINK+="ttySIM%E{ID_USB_INTERFACE_NUM}"
else
SUBSYSTEM=="tty", ATTRS{idVendor}=="1e0e", ATTRS{idProduct}=="9001", SYMLINK+="ttySIM%E{ID_USB_INTERFACE_NUM}", ATTRS{serial}=="0123456789ABCDEF"

Save, Load the new rule:
sudo udevadm control --reload-rules && sudo udevadm trigger

Or reboot:
sudo reboot

Verify this works:
ls -l /dev/ttySIM*

Install minicom
sudo apt-get install -y minicom

Commands minicom
close minicom
ctrl+a
x

echo on/off
ctrl+a
e

Problems minicom
sudo killall -9 minicom

Start minicom on the AT interface
sudo minicom -D /dev/ttySIM02

AT+CFUN? Check if active?.
AT+CFUN=1 for active and
AT+CFUN=0 for suspend
Make it active, if not
AT+CFUN=1

AT+IPR? Check baudrate
# baudrate 1200, 2400, 4800, 9600, 19200, 38400, 57600, 115200. "0" is auto
AT+IPR=115200 Set baudrate

AT+CGDCONT? Check APN
AT+CGDCONT=1,"IP","simstaticip.com" Set APN

SIM7600 Module works in wan mode by default 1, lan mode 0.
AT+CLANMODE? Check the current mode using.
AT+CLANMODE=1 Set sim7600 in wan mode

at+cgpaddr=1 Check if ISP has given sim7600 an IP addresse?.
If NOT "Houston we have problem???".

By default the SIM7600 PID is 9001 and the PID configuration is 9001:Diag, NMEA, At, Modem, Audio, Rmnet.
AT+CUSBPIDSWITCH? Check the current PID value.
If the response is 9001, no need to change the mode or if it is different PID value you can change it with.
AT+CUSBPIDSWITCH =9001,1,1 Change the PID to 9001.

AT+CSQ Network signal quality query, return signal value
0 (minimum, =< -113dBm) to 31 (maximum, >= -51 dBm)

AT+CNUM Query the phone number (not all SIM cards support this command), but sim7600 do

AT+CSCA? Get SMSC adresse
AT+CSCA="+4540590000",145 Set SMSC adresse

AT+COPS? Query the current operator, the operator information will be returned after normal networking

Install dependencies.
sudo apt update
sudo apt install -y modemmanager libmbim-utils libqmi-utils
sudo reboot

Setup nmcli as admin for modem connetion.
sudo mmcli --scan-modems
sudo mmcli -L
If not "/org/freedesktop/ModemManager1/Modem/1 [QUALCOMM INCORPORATED] SIMCOM_SIM7600G-H" or similar.
"Houston we have problem???".
If we have the string, look for the number, after /Modem/x, we have to remember this number.

We will use this number. To get information about the sim7600 number x. Here, I have the number x=1.
sudo mmcli --modem=1

Enable It.
sudo mmcli --modem=1 --enable

Set nmcli to handle modem USB connection. The name ifname(cdc-wdm0) is importent, as well the APN(simstaticip.com).
sudo nmcli c add type gsm ifname cdc-wdm0 con-name door_sim apn simstaticip.com

Run now.
ifconfig
And hopefully you got a IP address from your ISP provider??;

Reboot.
sudo reboot

Run after reboot, and check that you got a IP address.
ifconfig
And hopefully you got a IP address from your ISP provider?, You ar all done.

Check. Ping google.com via interfacet "wwan0"
ping -I wwan0 google.com
And hopefully you got a response.

Compile install SimpleBLE
sudo apt-get update
sudo apt-get install -y build-essential libpython3-dev libusb-dev libdbus-1-dev libglib2.0-dev libudev-dev libical-dev libreadline-dev
git clone https://github.com/OpenBluetoothToolbox/SimpleBLE.git
cd SimpleBLE/simpleble
mkdir build && cd build
cmake .. -B build_simpleble
cmake --build build_simpleble -j$(nproc)
sudo cmake --install build_simpleble
cd ~
sudo rm -R SimpleBLE

Er der problemer med header files for SimpleBle. Copy headers, så de er tilgængelige.
cd ~/SimpleBLE/simpleble/include
sudo cp -R simpleble /usr/local/include

SimpleBLE kan bruges på alle platforme.
Som test laver jeg en Arduino Bluetooth Server.

// Service name to the broadcasted to outside world
#define PERIPHERAL_NAME "PWB Device"
#define SERVICE_UUID "CD9CFC21-0ECC-42E5-BF22-48AA715CA112"
#define CHARACTERISTIC_INPUT_UUID "66E5FFCE-AA96-4DC9-90C3-C62BBCCD29AC"
#define CHARACTERISTIC_OUTPUT_UUID "142F29DD-B1F0-4FA8-8E55-5A2D5F3E2471"

PERIPHERAL_NAME er navnet som annonceres, Søg på bluetooth og navnet "PWB Device" skulle gerne dukke op.
SERVICE_UUID er serverns id. Kaldet uuid "CD9CFC21-0ECC-42E5-BF22-48AA715CA112".

En server kan have en eller flere BLECharacteristic.
Denne server har:
1.
PROPERTY_WRITE_NR og et PROPERTY_WRITE som vi knytter til uuid:CHARACTERISTIC_INPUT_UUID
Dette gør at uuid stringen "66E5FFCE-AA96-4DC9-90C3-C62BBCCD29AC" forbindes med alt som Arduino Severen sender ud.
2.
PROPERTY_READ og et PROPERTY_NOTIFY som vi knytter til uuid:CHARACTERISTIC_OUTPUT_UUID
Dette gør at uuid stringen "142F29DD-B1F0-4FA8-8E55-5A2D5F3E2471" forbindes med alt som Arduino Severen modtager.
Da jeg bruger PROPERTY_NOTIFY, gør det at alle som forbinder til denne Server kan sende en notifikation

Med andre ord. Der er nu lavet en bluetooth Server som enheder kan connecte til.
F.eks. en ESP32 med relæ, On/Off lampe.
Vi kan nu fra mobil connecte til serveren, se om lampen er tænt?, og eller slukke og tænde lampen.

# Her er en Arduino ino fil med koden til en sådan Bluetooth Server.
Når Arduino Serveren starter spytter den bluetooth adressen ud.
Her er koden som sørger for dette.
Serial.print("ESP Board Bluetooth MAC Address: ");
print_BT_DeviceAddress();

Det er vigtig at bemærke at alle uuid's er hard coded.
Og at Bluetooth adressen, er forskellig fra den ene ESP32 til den anden.
Bid nu mærke i denne adresse.
Den ESP32 jeg bruger har bluetooth adressen:
"E4:65:B8:70:87:6E"

Check with iphone lightblue. Install lightblue from App Store.
Start lightblue on iPhone.
Kik efter PERIPHERAL_NAME "PWB Device", som angivet i ino filen.
Du finder de resptive UUID's
Server uuid: CD9CFC21-0ECC-42E5-BF22-48AA715CA112
Sender uuid: 66E5FFCE-AA96-4DC9-90C3-C62BBCCD29AC
Reciver uuid: 142F29DD-B1F0-4FA8-8E55-5A2D5F3E2471
Hvis disse vises, virker Bluetooth Serveren.(Hurray).

Man kan, hvis man ellers kan programmere?, kan man lave en sådan Server på alle platforme.
Java,php,c,c++,pascal,delphi,python,bash,html,erlang,assembler,fortran,xcode,eclipse o.s.v eller med arduino kode som her.

Her laves nu en client i c++, med overbygningen boost asio beast.
Først har jeg lavet en klasse.
class ScanClass.
Det smarte ved denne er at den kører som et Thread, d.v.s når den er aktiveret, lever den sit eget liv. Man kan så multitaske(lave noget andet).
For at der kan snakkes med den, har jeg lavet nogle "public" set og get funktioner. Som kan bruges når vi har lyst.
For at holde det simpelt, har jeg fjernet en del kode som auto melder tilbage.
Her er det public interface:
bool isScanRunning()
bool peripheral_is_connected()
int get_addr_type()
int get_dbm_int()
int get_tx_power_int()
int get_peripheral_idx()
void set_time_to_scan(int val)
void set_peripheral_identifier_to_find(std::string val)
void set_peripheral_address_to_find(std::string val)
void set_uuid_read_to_find(std::string val)
void set_uuid_write_to_find(std::string val)
void do_write(std::string val)
std::string get_peripheral_address()
std::string get_peripheral_identifier()
De første 6 er "gettere" resten 8 er "settere".

Her sætter vi bluetooth adressen, vi vil connecte til:
set_peripheral_address_to_find("E4:65:B8:70:87:6E");
Her sætter vi uuid adressen, som vi kan skrive til:
set_uuid_read_to_find("66E5FFCE-AA96-4DC9-90C3-C62BBCCD29AC");
Her sætter vi uuid adressen, som vi kan læse fra :
set_uuid_write_to_find("142F29DD-B1F0-4FA8-8E55-5A2D5F3E2471");
Nu er der bare at køre.
Start();
Se video kommunikation mellem Arduino ino og c++.

# C++ Koden for Client Bluetooth.
Div Links to sites with Bluetooth BLE etc.

Esp32 Server UUID's
#Generate Use Linux command line.
uuidgen
#Or Web
Any Bluetooth Server most have a SERVICE_UUID
197a3db7-0fa9-4273-a76d-9b86d3c40565

And a read. CHARACTERISTIC_INPUT_UUID
859f0e9d-b377-46dd-9fa2-067b4451088e

And a write. CHARACTERISTIC_OUTPUT_UUID
1790162e-5879-4f39-b52e-5cf0b266ef97

Se en koden for Arduino ino BLE 2relay Server:

Check with iphone lightblue. Install lightblue from App Store.
Start lightblue on iPhone.
Kik efter PERIPHERAL_NAME "Sesam_open", som angivet i ino filen.
Du finder de resptive UUID's
197a3db7-0fa9-4273-a76d-9b86d3c40565
859f0e9d-b377-46dd-9fa2-067b4451088e
1790162e-5879-4f39-b52e-5cf0b266ef97
Hvis disse vises, virker Bluetooth Serveren.(Hurray).
Der kan nu laves et xcode project som connecter til Bluetooth Severen.

iPhone Swift XCode, I am using storyboard.
Dette er et Xcode project for styring af et 2relays modul.

Add permision for Bluetooth.
Target->Info->Bundle version (click + sign)
Select (Privacy - Bluetooth Peripheral Usage Descriptsion)
Set Value (This app uses Bluetooth to connect to peripherals.)

E-Paper GDEY0213Z98 122x250, SSD1680
librarys:
gxepd2
adafruit_gfx
U8g2_for_Adafruit_GFX

  • SSD1680
  • ESP32 WROVER
  • 3V3
  • 3V3
  • BUSY
  • 15
  • CS
  • 5
  • SCK
  • 18
  • MOSI
  • 23
  • DC
  • 0
  • RST
  • 2
  • GND
  • GND
// ESP32 CS(SS)=5,SCL(SCK)=18,SDA(MOSI)=23,BUSY=15,RES(RST)=2,DC=0
Init
display(GxEPD2_213_Z98c(/*CS=5*/ 5, /*DC=*/ 0, /*RST=*/ 2, /*BUSY=*/ 15));


Photoshop
Adjustment->Invert
Image->Mode->grayscale
Image->Mode->Bitmap

Generate 1-bitmap.
# update php gd
sudo apt update
sudo apt install -y php8.2-gd

git clone https://github.com/littlevgl/lv_utils.git
cd lv_utils
php img_conv_core.php "name=first_name&img=person_1.png&format=c_array&cf=indexed_1"
php img_conv_core.php "name=etage&img=Iconoir-Team-Iconoir-Building32.png&format=c_array&cf=indexed_1"

Se video flash epaper modul.

Backup dir
Arduino project SSD1680_GxEPD2: https://blohm.com/wp-content/themes/blohm-child/page-templates/rock/ESP32_EPaper/SSD1680_GxEPD2
Arduino project esp32_pins: https://blohm.com/wp-content/themes/blohm-child/page-templates/rock/ESP32_EPaper/esp32_pins

USE ESP32 Sketch Data Upload
Remember: The uploader will overwrite anything you had already saved in the filesystem.
First create dir "tools" in C:\Users\g\Documents\Arduino
Download the lastests esp32fs https://github.com/me-no-dev/arduino-esp32fs-plugin/releases/.
At the moment it is ESP32FS-1.1.zip
Extract ESP32FS-1.1.zip
From this extracted. Copy folder ESP32FS to C:\Users\g\Documents\Arduino\tools\ESP32FS

To use in your PROJECT
Create a Arduino project, normaly located in C:\Users\g\Documents\Arduino\PROJECT_NAME
Now create dir "data" in your project folder, and then create a file "config.json" in this folder.
And make the content.
C:\Users\g\Documents\Arduino\PROJECT_NAME\data\config.json
************************************************************
{
"ssid": "pwb_space",
"ssid_password": "spacewalk657"
}
************************************************************
Now restart Arduino.
You shut now have a new menu:
tools->ESP32 Sketch Data Upload
When you see the message "SPIFFS Image Uploaded", alles OK.
You now have a file config.json at the esp32 filesystem.

Se en koden for Arduino ino for config, and system files:

I use this for the board
Tools-> Board to "ESP32 Dev Module"

ESP32-CAM with OV2640 camera sensor

...

A zero-ohm resistor connects the top two pads(internal antenna).
Simply remove this resistor and place it between the bottom pads(external antenna).

collapseEsp32_6

collapseEsp32_7

APN Hotspot
Check the interfaces available in our system using iwconfig:
iwconfig
wlan0, show os it is a wireless extensions.
Check that our Wi-Fi card wlan0 supports AP mode:
nmcli -f WIFI-PROPERTIES.AP device show wlan0
Response: WIFI-PROPERTIES.AP: yes.
wlan0 is suppoted.

Add dns=dnsmasq as showed:
sudo nano /etc/NetworkManager/NetworkManager.conf
[main]
dns=dnsmasq

Need a DHCP server installed (e.g. dnsmasq). Install dnsmasq and stop,disable it:
sudo apt install -y dnsmasq
sudo systemctl disable dnsmasq
sudo systemctl stop dnsmasq

Reboot:
sudo reboot

To create an access point with the name "door_spot" and a password "spotHallo" run:
sudo nmcli con add type wifi ifname wlan0 mode ap con-name WIFI_AP ssid door_spot && \
sudo nmcli con modify WIFI_AP 802-11-wireless.band bg && \
sudo nmcli con modify WIFI_AP 802-11-wireless.channel 1 && \
sudo nmcli con modify WIFI_AP 802-11-wireless-security.key-mgmt wpa-psk && \
sudo nmcli con modify WIFI_AP 802-11-wireless-security.proto rsn && \
sudo nmcli con modify WIFI_AP 802-11-wireless-security.group ccmp && \
sudo nmcli con modify WIFI_AP 802-11-wireless-security.pairwise ccmp && \
sudo nmcli con modify WIFI_AP 802-11-wireless-security.psk spotHallo && \
sudo nmcli con modify WIFI_AP ipv4.method shared && \
sudo nmcli con up WIFI_AP
Response:
Connection 'WIFI_AP' (68d7d569-9982-4c31-a8c8-de780de273f1) successfully added.
Connection successfully activated (D-Bus active path: /org/freedesktop/NetworkManager/ActiveConnection/5)
Check for WiFi networks. A new network "door_spot" is add.

See and edit this files WiFi configuration can bee done as:
sudo nano /etc/NetworkManager/system-connections/WIFI_AP.nmconnection

Setup forwarding. Remove "#" in front off liniie.
sudo nano /etc/sysctl.conf
#linie 28, go to linie in nano "Ctrl" + "-", write 28, "Enter"
net.ipv4.ip_forward=1
#linie 33
net.ipv6.conf.all.forwarding=1

Add 1, to /proc/sys/net/ipv4/conf/all/forwarding.
sudo nano /proc/sys/net/ipv4/conf/all/forwarding
1

Add 1, to /proc/sys/net/ipv4/ip_forward.
sudo nano /proc/sys/net/ipv4/ip_forward
1

Restart NetworkManager.
sudo systemctl restart NetworkManager

See metric
route -n
ip route

Disable gateway,metric on interface.
sudo nmcli c mod 'Wired connection 1' ipv4.never-default true sudo nmcli c mod 'Wired connection 1' ipv6.never-default true

Set metric
sudo nmcli connection modify 'WIFI_AP' ipv4.route-metric 150
sudo nmcli connection up 'WIFI_AP'

# get the name of interface
sudo nmcli c

sudo nmcli c edit 'door_sim'
set ipv4.route-metric 100
save
quit

sudo nmcli c edit 'WIFI_AP'
set ipv4.route-metric 200
save
quit

sudo nmcli c edit 'Wired connection 1'
set ipv4.route-metric 300
save
quit

sudo systemctl restart NetworkManager

To have APN to give internet accesses over eth0.
sudo iptables -t nat -A POSTROUTING -o eth0 -j MASQUERADE
sudo iptables -A FORWARD -i eth0 -o wlan0 -m state --state RELATED,ESTABLISHED -j ACCEPT
sudo iptables -A FORWARD -i wlan0 -o eth0 -j ACCEPT

To have APN to give internet accesses over wwan0.
sudo iptables -t nat -A POSTROUTING -o wwan0 -j MASQUERADE
sudo iptables -A FORWARD -i wwan0 -o wlan0 -m state --state RELATED,ESTABLISHED -j ACCEPT
sudo iptables -A FORWARD -i wlan0 -o wwan0 -j ACCEPT

collapse_11

collapse_12

collapse_13

collapse_14

collapse_15

collapse_16

linphonec & linphonecsh
sudo apt update && sudo apt install -y --no-install-recommends libgl1 libglib2.0-0 libglew-dev

Check for old versions
whereis linphonecsh
whereis linphonec

extract linphone
cd ~
mkdir -p ~/linphone-sdk/build/linphone-sdk
cd ~/linphone-sdk/build/linphone-sdk

wget https://blohm.com/wp-content/themes/blohm-child/page-templates/rock/linphone/files/linphone_desktop_bak.tar.gz

tar xfz linphone_desktop_bak.tar.gz
rm linphone_desktop_bak.tar.gz
cd ~
sudo ln -s /home/rock/linphone-sdk/build/linphone-sdk/desktop/bin/linphonec /usr/local/bin/linphonec
sudo ln -s /home/rock/linphone-sdk/build/linphone-sdk/desktop/bin/linphonecsh /usr/local/bin/linphonecsh

sudo mkdir /root/.local/share/linphone

backup linphone
cd ~ tar -czf linphone_desktop_bak.tar.gz desktop

Get version
sudo linphonec -v

Start Linphone.
sudo linphonec
You will immediately receive a error that reads:
port 5060: Address already in use
That is, in fact, exactly what is happening. The standard communication
channel for the SIP protocol is UDP port 5060, and it's already in use by our
SIP Asterisk server. Let's tell Linphone to use port 5062 with this command:
linphonec> ports sip 5062

Now login, first time. Linphone will now remember you.
register sip:username@doorbell.doordk.com sip:doorbell.doordk.com password

Select what audio device to use for phone calls:
linphonec> soundcard list
linphonec> soundcard show
linphonec> soundcard use [number]

Select what video device to use for phone calls:
linphonec> webcam list
linphonec> webcam use [number]

Disable all codecs that are not PCMU or PCMA:
linphonec> codec list
linphonec> codec enable [number]
linphonec> codec disable [number]

Video codecs:
linphonec> vcodec list
linphonec> vcodec enable [number]
linphonec> vcodec disable [number]

All the settings that you've made will be saved to /root/.linphonerc

Important to register to sip server.
linphonec> register sip:username@doorbell.doordk.com sip:doorbell.doordk.com password


You are now insite the application linphone. Now type "help" or "help advanced". To get out type "quit".
Output help
Commands are:
---------------------------
help Print commands help.
answer Answer a call
autoanswer Show/set auto-answer mode
call Call a SIP uri or number
calls Show all the current calls with their id and status.
call-logs Calls history
camera Send camera output for current call.
chat Chat with a SIP uri
conference Create and manage an audio conference.
duration Print duration in seconds of the last call.
firewall Set firewall policy
friend Manage friends
ipv6 Use IPV6
mute Mute microphone and suspend voice transmission.
nat Set nat address
pause pause a call
play play a wav file
playbackga Adjust playback gain.
proxy Manage proxies
record record to a wav file
resume resume a call
soundcard Manage soundcards
stun Set stun server address
terminate Terminate a call
transfer Transfer a call to a specified destination.
unmute Unmute microphone and resume voice transmission.
webcam Manage webcams
quit Exit linphonec
---------------------------
Type ' help ' for more details or
' help advanced' to list additional commands.

Output help advanced
Advanced commands are:
---------------------------
codec Audio codec configuration
vcodec Video codec configuration
ec Echo cancellation
el Echo limiter
nortp-on-audio-mute Set the rtp_no_xmit_on_audio_mute configuration parameter
vwindow Control video display window
pwindow Control local camera video display (preview window)
snapshot Take a snapshot of currently received video stream
preview-snapshot Take a snapshot of currently captured video stream
vfureq Request the other side to send VFU for the current call
states Show internal states of liblinphone, registrations and calls, according to linphonecore.h definitions
register Register in one line to a proxy
unregister Unregister from default proxy
status Print various status information
ports Network ports configuration
param parameter set or read as normally given in .linphonerc
speak Speak a sentence using espeak TTS engine
staticpic Manage static pictures when nowebcam
identify Returns the user-agent string of far end
ringback Specifies a ringback tone to be played to remote end during incoming calls
redirect Redirect an incoming call
zrtp-set-verified Set ZRTP SAS verified.
zrtp-set-unverified Set ZRTP SAS not verified.
---------------------------
Type 'help ' for more details.

At the rock's command-line type, to see linphones config file.
sudo cat /root/.linphonerc

Linphonecsh

Linphonecsh is a small utility to send basic commands to a linphonec (console mode linphone) process.
Unlike linphonec, linphonecsh does not wait commands from standard input: it takes the command from its arguments
and sends it using unix pipe to a linphonec process started in daemon mode.
The motivation for this tool is for example to simply execute voip calls from scripts, web-servers, or javascript web pages.

Allways init before use.
sudo linphonecsh init -a -C -c /root/.linphonerc -d 6 -l /home/rock/linphone_log.txt

linphonec running in daemon mode.
sudo linphonecsh -h

linphonecsh generic
The resulting linphonec daemon does not read or write any configuration file. Use the -c to read from configuration file.
sudo linphonecsh init -c ~/.linphonerc

linphonecsh commands.
sudo linphonecsh generic "help ports"
sudo linphonecsh generic "ports" //prints current used ports.
sudo linphonecsh generic "ports sip 5062" //Sets the sip port to 5062.

sudo linphonecsh generic "help soundcard"
sudo linphonecsh generic "soundcard list" //list all sound devices.
sudo linphonecsh generic "soundcard show" //show current sound devices configuration.
sudo linphonecsh generic "soundcard use (index)" //select a sound device to use.

sudo linphonecsh generic "help codec"
sudo linphonecsh generic "codec list" //list audio codecs
sudo linphonecsh generic "codec enable (index)" //enable available audio codec
sudo linphonecsh generic "codec disable (index)" //disable audio codec

sudo linphonecsh generic "help vcodec"
sudo linphonecsh generic "vcodec list" //list video codecs
sudo linphonecsh generic "vcodec enable (index)" //enable available video codec
sudo linphonecsh generic "vcodec disable (index)" //disable video codec

sudo linphonecsh generic "help camera"
sudo linphonecsh generic "camera on" //allow sending of local camera video to remote end.
sudo linphonecsh generic "camera off" //disable sending of local camera's video to remote end.

sudo linphonecsh generic "help stun"
sudo linphonecsh generic "stun" //show stun settings.
sudo linphonecsh generic "stun (addr)" //set stun server address.

sudo linphonecsh generic "help firewall"
sudo linphonecsh generic "firewall" //show current firewall policy.
sudo linphonecsh generic "firewall none" //use direct connection.
sudo linphonecsh generic "firewall nat" //use nat address given with the 'nat' command.
sudo linphonecsh generic "firewall stun" //use stun server given with the 'stun' command.
sudo linphonecsh generic "firewall ice" //use ice.
sudo linphonecsh generic "firewall upnp" //use uPnP IGD.

sudo linphonecsh generic "help webcam"
sudo linphonecsh generic "webcam list" //list all known devices.
sudo linphonecsh generic "webcam use (index)" //select a video device.

sudo linphonecsh generic "help autoanswer"
sudo linphonecsh generic "autoanswer" //show current autoanswer mode
sudo linphonecsh generic "autoanswer enable" //enable autoanswer mode
sudo linphonecsh generic "autoanswer disable" //disable autoanswer mode

sudo linphonecsh generic "status autoanswer"
sudo linphonecsh generic "status hook"
sudo linphonecsh generic "status register"

sudo linphonecsh generic "register sip:username@doorbell.doordk.com sip:doorbell.doordk.com password"

Allways exit.
sudo linphonecsh exit

ps aux | pgrep linphonec
If showing linphonec --pipe. linphonec is running.

Test program c++.
Look at c++ linphone.

Download a c++ linphone program to compile.
NB. Uses MiniIni.
Function init_linphone(), shows how til initialize /root/.linphonerc before register.
wget https://blohm.com/wp-content/themes/blohm-child/page-templates/rock/linphone/files/linphone.cpp

Problems linphonec
sudo killall -9 linphonec

Establishing a Connection to APNs

...
Apple provides two authentication methods p8 vs p12

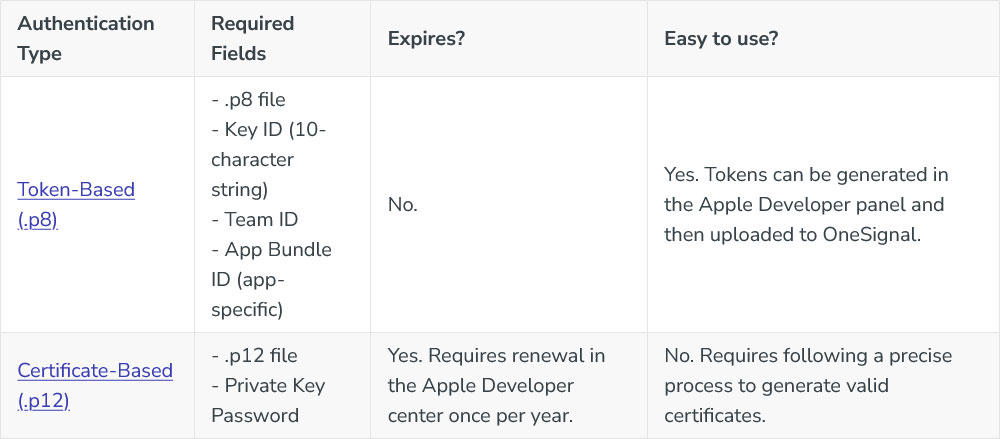
Using Token-Based (.p8) vs Certificate-Based (.p12) Authentication to APNs.

Previous Token Revokation You can have up to two .p8 keys in your Apple account. If you need to generate a third key, you will need to revoke one of your existing keys and it can no longer be used.

Note: .p8 keys are in the “keys” section of the Apple developer account and the .p12 certificates are under “certificates”. In your Apple account, you can only have two .p8 keys, but you can have both active .p12s and .p8s.

https://developer.apple.com

Firebase Browser Push Notification

Firebase Android Push Notification

Firebase IOS Push Notification

Install iptables.


sudo apt install -y iptables

delete old configuration, if any.
Flush all the rules in filter and nat tables
sudo iptables --flush && sudo iptables --table nat --flush

delete all chains that are not in default filter and nat table, if any.
sudo iptables --delete-chain && sudo iptables --table nat --delete-chain

cd ~
nano reset_iptabeles.sh
*********************************

#!/bin/bash
# IPv6

##
## set default policies to let everything in
ip6tables --policy INPUT   ACCEPT;
ip6tables --policy OUTPUT  ACCEPT;
ip6tables --policy FORWARD ACCEPT;

##
## start fresh
ip6tables -Z; # zero counters
ip6tables -F; # flush (delete) rules
ip6tables -X; # delete all extra chains

# IPv4

## 
## set default policies to let everything in
iptables --policy INPUT   ACCEPT;
iptables --policy OUTPUT  ACCEPT;
iptables --policy FORWARD ACCEPT;

##
## start fresh
iptables -Z; # zero counters
iptables -F; # flush (delete) rules
iptables -X; # delete all extra chains

# delete old configuration, if any
# Flush all the rules in filter and nat tables
iptables --flush             
iptables --table nat --flush
		   
# delete all chains that are not in default filter and nat table, if any
iptables --delete-chain    
iptables --table nat --delete-chain
chmod u+x reset_iptabeles.sh
*********************************

UFW setup.


# Install UFW, setp rules.
sudo apt install -y ufw
sudo ufw disable

sudo ufw default allow outgoing && sudo ufw default deny incoming && \
sudo ufw allow proto tcp from any to any port 22,80,443 comment 'Open SSH HTTP/HTTPS ports' && \
sudo ufw allow 10000:20000/udp comment '{(Asterisk SIP Clients)}' && \
sudo ufw allow 1194/udp comment '{(OpenVPN)}' && \
sudo ufw allow 5060 comment '{(Asterisk pjsip.conf port)}' && \
sudo ufw allow 5062 comment '{(Linphone port)}' && \
sudo ufw allow 8088 comment '{(SIP over WebSocket)}' && \
sudo ufw allow 8089 comment '{(SIP over WebSocket)}' && \
sudo ufw allow 995 comment '{(POP3S)}' && \
sudo ufw allow 993 comment '{(IMAPS)}' && \
sudo ufw allow 587 comment '{(STARTTLS over SMTP)}' && \
sudo ufw allow 465 comment '{(SMTPS)}' && \
sudo ufw allow 143 comment '{(IMAP)}' && \
sudo ufw allow 110 comment '{(POP3)}' && \
sudo ufw allow 25 comment '{(SMTP)}' && \
sudo ufw allow 8443 comment '{(STUN)}' && \
sudo ufw allow 53 comment '{(DNS BIND)}'

sudo ufw show added

sudo ufw enable
sudo ufw status verbose

# only when running
sudo ufw status
sudo ufw status numbered

# Reset delete all rules
sudo ufw reset

Fail2ban setup.


# Install fail2ban
wget https://github.com/fail2ban/fail2ban/archive/refs/tags/1.0.2.tar.gz
tar xzf 1.0.2.tar.gz
cd fail2ban-1.0.2
sudo python setup.py install
sudo cp -a build/fail2ban.service /usr/lib/systemd/system/
sudo systemctl daemon-reload
sudo systemctl start fail2ban
sudo systemctl enable fail2ban
sudo systemctl restart fail2ban
sudo systemctl status fail2ban

# make jail.local
sudo cp /etc/fail2ban/jail.conf /etc/fail2ban/jail.local
# or, a one liner
sudo cp /etc/fail2ban/jail.{conf,local}

sudo nano /etc/fail2ban/jail.local
******************************************

ignoreip = 127.0.0.1/8 ::1 80.91.3.214 10.42.0.0/24 192.168.1.0/24	#92
bantime = 1d		#101 "bantime" is the time that a host is banned 10m=10minutter 1d=1dag.
findtime = 10m		#105 A host is banned if it has generated "maxretry" during the last "findtime" 10m=10minutter
maxretry = 3 		#108 maxretry the maximum number of failures before the IP is blocked.
					
******************************************
sudo systemctl restart fail2ban
sudo systemctl status fail2ban

# Test your configuration
fail2ban-client --test

# See the log
sudo cat /var/log/fail2ban.log
# clear the log
sudo truncate -s 0 /var/log/fail2ban.log

# Fail2ban ships with a command-line tool named fail2ban-client
sudo fail2ban-client version
sudo fail2ban-client -h

# check status
sudo fail2ban-client status

# Ban an IP address
sudo fail2ban-client set sshd banip 23.34.45.56

# Unlocking an IP address
sudo fail2ban-client set sshd unbanip 125.124.221.121

# To activate a rule, use its name from the configuration file and the command:
sudo fail2ban-client add sshd

# Then start it.
sudo fail2ban-client start sshd

# status of jail sshd
sudo fail2ban-client status sshd

SMS Server Setup

Update controller.
sudo apt update && sudo apt upgrade -y && sudo apt autoremove && sudo apt autoclean

Check om der er et GSM module.
lsusb
Hvis ikke følg anvisningerne

Under menu'en SIM7600.

Se assignment.

ls -l /dev/ttySIM*

Install Under menu'en Libserialport.

Install Under menu'en Boost C++.

collapse_24


Business plan vs. business roadmap

Icons, billeder brugt til illustration.